Leather goods are a timeless fashion statement that exude luxury and style. However, over time, leather can lose its shine and even crack. Polishing leather with beeswax is a great way to restore its lustre and keep it looking new. The process may seem intimidating, but with the right materials and steps, anyone can do it themselves at home. In this article, we will guide you through the simple process of polishing leather with beeswax step-by-step, along with some helpful tips and tricks to get that perfect finish.
Materials Needed

One of the keys to achieving a professional-looking polished leather is to use the right materials. With the right tools and ingredients, you can give your leather accessories and furniture a long-lasting shine. In this step-by-step guide, we’ll go over the essential materials needed to polish leather with beeswax. From beeswax to boiled linseed oil, you’ll find out what items to have on hand before starting the polishing process. So, let’s dive in and explore the necessary materials! And if you’re interested in other eco-friendly and natural polishing methods, check out our articles on vinegar furniture polishing, benefits of essential oils as natural polishes, and baking soda for cleaning and polishing.
Beeswax
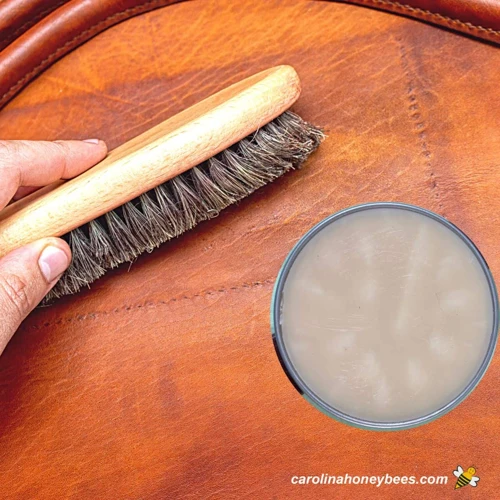
One of the main materials needed for polishing leather is beeswax. Beeswax is a natural wax that is produced by honeybees and is commonly used in a variety of household applications such as candles, cosmetics, and even in cooking.
When using beeswax for leather polishing, it is important to choose a high-quality, pure product. Impurities in low-quality beeswax can leave residue on the leather and give an uneven finish. It is also important to note that beeswax is not suitable for all types of leather, for example, it is not recommended for use on suede leather.
Using beeswax to polish leather has many benefits. It provides a protective barrier against moisture and stains, helps to preserve the leather’s natural oils, and gives a beautiful shine to the surface. Beeswax is also an eco-friendly alternative to chemical-based leather polishes.
To use beeswax for polishing leather, you will need to melt it down into a liquid form. This can be done using a small pot or container on a low heat stove setting or by using a hairdryer to melt the beeswax. Once melted, other ingredients such as boiled linseed oil can be added to create a beeswax mixture that can be applied to the leather.
Beeswax is a versatile and natural material that is great for polishing leather. It is an eco-friendly alternative to chemical-based leather polishes and provides many benefits to the leather’s durability and appearance.
Clean Cloth
One of the essential materials needed for polishing leather with beeswax is a clean cloth. It is important to use a soft and lint-free cloth to avoid leaving any residue or scratches on the leather. It is recommended to use a microfiber cloth or an old t-shirt.
Cleaning the leather before applying the beeswax mixture is crucial to ensure that it adheres properly and does not trap dirt. To clean the leather, use a damp cloth or sponge to wipe away any dirt or debris. Avoid using soap, as it can dry out the leather and cause it to crack.
If your leather is particularly dirty or stained, you might want to use a specialized cleaner. However, it is important to test the cleaner first on a small, inconspicuous area before applying it to the entire surface.
Once the leather is clean and dry, you can move on to applying the beeswax mixture. However, make sure that there is no moisture on the leather, as it can interfere with the adhesion of the wax. A clean cloth is an important component in achieving a polished and pristine finish for your leather items.
Using olive oil to polish wooden furniture is another popular eco-friendly polishing technique that can be helpful for keeping your home clean and polished.
Boiled Linseed Oil
Boiled Linseed Oil is a popular natural product that is commonly used to protect and maintain leather. It is made from flaxseed and has properties that help to protect leather from moisture and cracking. The oil is also known for adding a beautiful shine to leather products.
When using boiled linseed oil, it is essential to apply it sparingly, as too much can cause greasiness and stickiness on the leather surface. Just a few drops of it are enough to achieve the desired effect.
It is important to note that boiled linseed oil should not be confused with raw linseed oil, which is not boiled but gets dry over a long time. When using raw linseed oil, the application process is different and takes much longer.
In addition to being useful for polishing leather, boiled linseed oil has many other applications, such as being a great eco-friendly option for polishing silverware. It can be used when citric acid polishing to add extra shine to copper or brass surfaces.
Here are some more details about boiled linseed oil:
| Property | Details |
|---|---|
| Color | Yellowish |
| Drying Time | 24 to 48 hours |
| Odor | Mild |
| Uses | Polishing leather, preserving wood, and as a binder in oil paints |
| Application Method | Apply with a clean cloth in circular motions and let dry after application |
Boiled linseed oil is a versatile and natural solution for many applications, but it is important to apply it correctly to achieve the desired results.
Small Pot or Container
In order to prepare the beeswax mixture for polishing leather, you will need a small pot or container to melt the beeswax in. This pot or container should be heat-resistant and easy to handle.
It is important to use a pot or container that you are comfortable using and that is appropriate for melting beeswax. If you are unsure, it is best to use a dedicated pot or container for this purpose.
When choosing a pot or container, consider the size of the leather item you will be polishing. For smaller items, a small saucepan or metal container may be sufficient. For larger items, a larger pot may be necessary.
To avoid causing damage to the pot or container or any other objects, be sure to always use oven mitts or pot holders to handle the container once the beeswax mixture has been heated.
Choosing the right pot or container is an important step in the process of preparing beeswax for polishing leather. With a suitable container and a bit of care, you can make your own beeswax mixture and give your leather items a beautiful shine.
Step-by-Step Guide
Now that you have gathered all the necessary materials, it’s time to start polishing your leather with beeswax! This process may seem daunting, but with our step-by-step guide, you will be able to achieve a beautiful shine on your leather items. Follow the instructions carefully, and before you know it, your leather items will look as good as new. If you’re interested in other eco-friendly polishing methods, check out our guide on polishing silverware using eco-friendly methods, or our tips for polishing metal with citric acid.
Step 1: Clean the Leather
To begin polishing leather with beeswax, it’s essential to clean the leather thoroughly first. This will help remove any dirt and debris that may be on the surface of the leather, allowing the beeswax to penetrate deeper for a better shine. Follow the steps below to clean your leather properly:
- Step 1: Use a soft-bristled brush to remove any loose dirt or debris from the surface of the leather. Be sure to brush along the grain of the leather to avoid causing any damage.
- Step 2: Dampen a clean cloth with water and wring it out so that it’s only slightly damp. Wipe down the surface of the leather to remove any remaining dirt or debris.
- Step 3: If your leather is particularly dirty or stained, mix a small amount of mild soap with water and use a clean cloth to spot clean the leather. Be sure to rinse the area with a clean, damp cloth to remove any soapy residue.
- Step 4: Allow the leather to dry completely before moving on to the next step.
By following these steps, you’ll be able to remove any dirt and debris from your leather, preparing it for the next steps of the beeswax polishing process.
Step 2: Melt the Beeswax
To begin the process of polishing leather with beeswax, you’ll need to melt the beeswax. Follow these steps to melt the beeswax properly:
| Step 2a: | Take the beeswax and chop it into small pieces using a sharp knife. This will help the beeswax to melt evenly. |
| Step 2b: | Place the chopped beeswax into a small pot or container. Alternatively, you can use a double boiler if you have one. |
| Step 2c: | Heat the pot or container over low heat until the beeswax is completely melted. Be careful not to overheat the beeswax as it can become flammable. |
| Step 2d: | If you want to speed up the melting process, you can use a hair dryer on a low heat setting to gently warm the beeswax. Hold the hair dryer about 6 inches away from the container and move it around to avoid overheating one spot. |
By following these simple steps, you’ll have perfectly melted beeswax that is ready to be combined with boiled linseed oil and applied to your leather items. Just be sure to keep a watchful eye on the melting process to ensure that the beeswax doesn’t overheat or become too hot to handle.
Step 3: Add Boiled Linseed Oil to Beeswax
Step 3: Adding boiled linseed oil to beeswax is an important step in the process of polishing leather. Here’s how to do it:
- Measure out the boiled linseed oil: You’ll need roughly a tablespoon of boiled linseed oil for every ounce of beeswax you’re using.
- Melt the beeswax: If your beeswax has already cooled down and solidified, you’ll need to reheat it. Follow the instructions from step 2. Once the beeswax has melted completely, remove the pot from the heat.
- Add the boiled linseed oil: Slowly pour the boiled linseed oil into the melted beeswax, stirring constantly with a clean spoon or spatula. Make sure the oil and wax are well blended. The mixture should be smooth and free of lumps.
- Continue stirring until the mixture is cool enough to touch: The beeswax mixture will thicken as it cools, but you don’t want it to harden completely. The ideal temperature is when the mixture is still spreadable but has some firmness.
By adding boiled linseed oil to beeswax, you are creating a conditioning and protective layer on the leather that will keep it looking good for years to come. The boiled linseed oil penetrates the leather to provide nourishment, while the beeswax acts as a barrier against moisture and dirt.
Step 4: Apply Beeswax Mixture to the Leather
Step 4: Applying the Beeswax Mixture to the Leather
1. Take a clean cloth and dip it into the beeswax mixture.
2. Apply a thin, even layer of the mixture onto the leather.
3. Use circular motions to work the mixture into the leather.
4. Make sure to cover the entire surface of the leather, including any crevices or folds.
5. Apply more of the mixture as needed, but be careful not to overdo it.
6. Let the leather sit for a few minutes so that the mixture can penetrate the surface and seep into any cracks or crevices.
7. If you notice any excess mixture on the surface, use a clean cloth to wipe it away.
8. Keep in mind that the leather may darken initially after applying the mixture, but it will lighten back up over time.
Step 5: Buff the Leather
After applying the beeswax mixture to the leather, it’s time to buff the leather to bring out its shine. Here’s how to effectively buff the leather:
| Step | Action |
| 1 | Take a clean, dry cloth and fold it into a small square. |
| 2 | Using the cloth, start rubbing the leather in circular motions. |
| 3 | Apply pressure as you buff to help bring out the shine in the leather. |
| 4 | Continue buffing until the leather has a smooth, polished look. |
| 5 | Use a separate clean cloth to wipe away any excess beeswax mixture or debris. |
It’s important to remember that buffing should be done gently to avoid damaging the leather. Also, be sure to use a clean cloth to prevent any dirt or debris from causing scratches or marks on the leather. With these steps, your leather will be looking shiny and new!
Tips and Tricks
As with any skill, there are always tips and tricks to help make the job easier and more successful. When it comes to polishing leather with beeswax, there are a few things you can do to get the best results possible. From testing on an inconspicuous area first to applying multiple coats for a higher shine, incorporating these tips into your leather polishing routine will leave you with beautiful, shiny leather that looks like new. So, let’s dive into these helpful tips that will take your leather polishing game to the next level.
Tip 1: Test on Inconspicuous Area First
It’s important to test the beeswax mixture on an inconspicuous area of the leather item before applying it all over. This tip is crucial because some leather items may react differently to the beeswax mixture, depending on the type of leather and previous treatments the leather has received.
To test the beeswax mixture, apply a small amount to an area of the leather item that is not visible, such as the underside of a strap or the back of a pocket. Leave it on for a few hours to see if the leather changes color or becomes damaged. If there are no negative effects, then it should be safe to apply the beeswax mixture to the rest of the leather item.
Testing on an inconspicuous area first can save you from potentially ruining your entire leather item. It’s always better to be cautious and take the time to test first, rather than regretting not doing so later. Remember, different types of leather require different treatment, so performing a test before applying the beeswax mixture on visible leather surfaces can prevent unwanted results.
Tip 2: Use a Hair Dryer to Melt Beeswax
Tip 2: Use a hair dryer to melt beeswax for a faster and more efficient process.
If you are short on time or are finding it difficult to melt the beeswax using the double boiler method, using a hair dryer can be a great alternative. Simply place the beeswax in a heat-safe container and use a hair dryer on high heat to melt the wax. Make sure to use caution and keep the hair dryer at a safe distance from the beeswax to avoid any accidents.
This method is especially helpful if you only need to melt a small amount of beeswax. It is also a great option if you are in a hurry but still want to achieve the same high-quality results. Just be sure to monitor the wax closely as it melts to prevent it from overheating and becoming too liquidy.
Using a hair dryer to melt beeswax can be a quick and convenient option for anyone looking to polish their leather using this method. Give it a try and see how it works for you!
Tip 3: Apply Multiple Coats for More Shine
An additional tip for achieving an even greater shine on your leather is to apply multiple coats of the beeswax mixture. This can be particularly effective if you are working with an older or more worn piece of leather.
Why apply multiple coats?
Applying multiple coats allows for the wax to build up on the leather, creating a deeper, richer shine. Additionally, it can help to fill in any cracks or creases in the leather, improving its overall appearance and durability.
How to apply multiple coats?
To apply multiple coats, follow the same steps as before, starting with a clean piece of leather. Apply a thin layer of the beeswax mixture, then allow it to dry completely. Once dry, apply another layer, repeating until you have achieved the desired level of shine.
How many coats should you apply?
The number of coats you should apply will depend on the type and condition of the leather, as well as your personal preference. In general, however, it is recommended to apply at least three coats to achieve a noticeable improvement in shine.
Additional Tips
When applying multiple coats, be sure to buff the leather thoroughly between each application to ensure an even finish. You may also want to consider using a slightly lighter touch with each subsequent coat to avoid over-saturating the leather.
Applying multiple coats of beeswax to your leather can be a great way to improve its appearance and durability. With a little patience and attention to detail, you can achieve a beautiful, long-lasting shine that will keep your leather looking its best for years to come.
Tip 4: Store Beeswax Mixture in a Cool Place
One important tip to keep in mind when using beeswax to polish leather is to store the mixture in a cool place. This is because beeswax is sensitive to changes in temperature and can melt or become too soft when exposed to heat.
To ensure the longevity of your beeswax mixture, follow these storage guidelines:
| Store in a Cool Place | Avoid storing your beeswax mixture in areas that are exposed to direct sunlight or heat sources, such as a stove or a radiator. Instead, choose a cool and dry place, such as a cupboard or pantry. |
| Keep in an Airtight Container | Beeswax can also absorb moisture from the air, which can affect its texture and quality. That’s why it’s important to keep the mixture in an airtight container, such as a jar with a lid or a plastic tub with a tight-fitting cover. This will help prevent moisture from entering and keep the beeswax mixture dry and solid. |
| Avoid Extreme Temperatures | If you live in an area with extreme temperatures, such as very hot summers or very cold winters, you may need to take extra precautions to store your beeswax mixture. Consider keeping it in a temperature-controlled room or using an insulated container to protect it from extreme heat or cold. |
By following these storage tips, you can ensure that your beeswax mixture will stay fresh and effective for future use.
Conclusion
In conclusion, polishing leather with beeswax is a simple and effective way to restore its shine and prolong its lifespan. By using natural ingredients like beeswax and boiled linseed oil, you can avoid harsh chemicals and achieve a beautiful finish. Remember to clean the leather thoroughly before applying the beeswax mixture, and take your time to buff it to a shine. Testing the mixture on an inconspicuous area first is also recommended, as well as applying multiple coats for a more pronounced shine. Additionally, storing the beeswax mixture in a cool place will help to prevent it from spoiling. With these tips and tricks, you can enjoy the timeless beauty of your leather items for years to come. So why not give it a try and experience the satisfying results for yourself?
Frequently Asked Questions
What type of leather can be polished with beeswax?
Beeswax can be used to polish any type of leather, including full-grain, top-grain, and suede.
Is beeswax safe for leather?
Yes, beeswax is safe for leather as it is a natural ingredient and does not contain harmful chemicals.
How often should I polish my leather with beeswax?
It is recommended to polish your leather with beeswax every 3 to 6 months, depending on how often you use it.
Can I use beeswax on leather shoes?
Yes, beeswax can be used on leather shoes to give them a shiny and polished look.
What is boiled linseed oil and why is it added to beeswax?
Boiled linseed oil is a natural oil that is added to beeswax to help soften the wax and make it easier to apply to the leather.
How do I clean the leather before applying beeswax?
You can clean the leather using a damp cloth and mild soap. Make sure to let the leather dry completely before applying the beeswax.
Can I apply multiple coats of beeswax?
Yes, you can apply multiple coats of beeswax to the leather for a more polished look. Just make sure to let each coat dry completely before applying the next one.
How do I buff the leather after applying beeswax?
You can buff the leather using a clean cloth or a soft-bristled brush. Apply gentle pressure and buff in circular motions until the leather has a shiny finish.
What should I do if the beeswax mixture hardens in the container?
You can heat the container using a hair dryer or warm water to soften the beeswax mixture.
Can I store the beeswax mixture in the fridge?
No, it is not recommended to store the beeswax mixture in the fridge as it can cause the mixture to harden and become difficult to apply.